PlutoUI.jl
Pluto notebooks can use @bind to add interactivity to your notebook. It's a simple concept - it uses the same reactivity that you have when editing code, except now you use sliders and buttons, instead of editing code.
To use it in other notebooks
Simply import the PlutoUI package, and Pluto's built-in package manager takes care of the rest!
using PlutoUIBasic inputs
Slider
@bind x Slider(5:15)xUsing keyword arguments, you can set the default value, and you can ask to show the current value:
@bind y Slider(20:0.1:30; default=25, show_value=true)yNot just number ranges!
The first argument is range, but it can also be a Vector (not necessarily in increasing order). And the elements can be of any type, not just numbers!
@bind which_function Slider(["sin", "cos", "sqrt"])which_function == "sin" ? sin(π) : which_function == "cos" ? cos(π) : sqrt(π)
Show docstring for Slider
Slider
A slider over the given values.
Examples
@bind x Slider(1:10)
@bind x Slider(0.00 : 0.01 : 0.30)
@bind x Slider(1:10; default=8, show_value=true)
@bind x Slider(range(-π, π, 1000); default=0, show_value=x-> "$(round(x, digits=2)) rad")
@bind x Slider(["hello", "world!"])
Scrubbable
Scrubbable makes a number interactive – you can click and drag its value left or right using your mouse or touch screen.
Try it in the text below:
If Alice has
...then Alice has 17 apples left.
Use the Live Docs to learn more about Scrubbable!
Show docstring for Scrubbable
Scrubbable
An inline number that can be changed by clicking and dragging the mouse.
Examples
md"""
_If Alice has $(@bind a Scrubbable(20)) apples,
and she gives $(@bind b Scrubbable(3)) apples to Bob..._
"""
md"""
_...then Alice has **$(a - b)** apples left._
"""In the examples above, we give the initial value as parameter, and the reader can change it to be lower or higher.
Custom range
Besides an initial value, a scrubbable number also has an array of possible values that can be reached. When you pass a single number to Scrubbable, this array is automatically created.
You can also specify the array manually:
@bind apples Scrubbable(200 : 300; default=220)Formatting
The library d3-format is used to format floating-point numbers. You can specify a format string like ".2f" to be used to format the scrubbable value. Have a look at their documentation to see more examples.
@bind money Scrubbable(30e6, format=".0s", prefix="€ ")
@bind coolness Scrubbable(0.80 : 0.01 : 1.00, format=".0%", prefix="you are 🌝 ", suffix=" cool")
Scrubbable(A::Matrix{<:Real}; kwargs...)The PlutoUI.Scrubbable widget, but in a 2D grid. Additional keyword arguments will apply to all scrubbables.
NumberField
A NumberField can be used just like a Slider, it just looks different:
NumberField(0:100, default=20)<img src="https://upload.wikimedia.org/wikipedia/commons/thumb/1/15/Welsh_Springer_Spaniel.jpg/500px-Welsh_Springer_Spaniel.jpg" width="200">
You can also use NumberField without a range, and without a default:
@bind x_very_different NumberField()x_very_different
Show docstring for NumberField
NumberField
A box where you can type in a number, optionally within a specific range.
Examples
@bind x NumberField(1:10)
@bind x NumberField(0.00 : 0.01 : 0.30)
@bind x NumberField(1:10; default=8)
Without a predefined range:
@bind x NumberField()
@bind x NumberField(default=37)
Switch
A Boolean input.
@bind z Switch()Default value:
@bind having_fun Switch(default=true)having_funhaving_fun ? "🎈🎈" : "☕"
Show docstring for Switch
Switch
Switch(; default::Bool=false)A false/true input element, displayed as a sliding switch. This is the same as PlutoUI.CheckBox, but with a different visual style.
Tip
The Switch is simple, but you can use it in very powerful ways with reactivity! For example, you can use these two cells to switch between a beginner/expert explanation of a topic:
md"""
Show a simplified version: $(@bind simplified Switch(default=true))
"""
if simplified
md"""
Just use `a² + b² = c²` when it feels right.
"""
else
md"""
Suppose you have a right triangle with sides *a*, *b*, and hypotenuse *c*. Imagine building squares on each side of the triangle. The **area** of the square on side *a* is *a²*, on *b* is...
"""
endYou can also use simplified in other parts of your code. E.g. to change a plot label:
plot(x, y;
	label=simplified ? "Data" : "Monte Carlo simulation results"
)
CheckBox
A Boolean input.
CheckBox is the same as a Switch, but in a different visual style.
@bind check_me CheckBox()check_me
Show docstring for CheckBox
CheckBox
A checkbox to choose a Boolean value true/false.
Examples
@bind programming_is_fun CheckBox()
@bind julia_is_fun CheckBox(default=true)
md"Would you like the thing? $(@bind enable_thing CheckBox())"
TextField
@bind s TextField()With a default value:
@bind sentence TextField(default="te dansen omdat men leeft")You can also create a multi-line text box!
@bind poem TextField((30, 3), "Je opent en sluit je armen,\nMaar houdt niets vast.\nHet is net zwemmen.")

# (poem by: Sanne de Kroon)string.(split(poem, "\n"))
Show docstring for TextField
TextField
# single-line:
TextField(default="", placeholder=nothing)

# with specified size:
TextField(size; default="", placeholder=nothing)
A text input - the user can type text, the text is returned as String via @bind.
Keyword arguments
default: the initial valueplaceholder: a value to display when the text input is empty
size argument
If
sizeis a tuple(cols::Integer, row::Integer), a multi-line<textarea>will be shown, with the given dimensions.If
sizeis an integer, it controls the width of the single-line input.
Examples
@bind author TextField()@bind poem TextField((30,5); default="Hello\nJuliaCon!")Select
@bind vegetable Select(["potato", "carrot"])vegetable@bind favourite_function Select(["sin", "cos", "tan", "sqrt"])favourite_function == "sin" ? sin(2) : favourite_function == "cos" ? cos(2) : favourite_function == "tan" ? tan(2) : sqrt(2)Instead of an array of values, you can also give an array of pairs, where the first item is the bound value, and the second item is displayed.
@bind fruit Select(["apple" => "🍎", "melon" => "🍉"])fruitLike Slider, you use a vector with any type of object, not just Strings. The default keyword argument controls the initial setting.
Show docstring for Select
Select
Select(options::Vector; [default])
# or with a custom display value:
Select(options::Vector{Pair{Any,String}}; [default::Any])
A dropdown menu - the user can choose an element of the options vector.
See MultiSelect for a version that allows multiple selected items.
Examples
@bind veg Select(["potato", "carrot"])@bind f Select([sin, cos, tan, sqrt])
f(0.5)You can also specify a display value by giving pairs bound_value => display_value:
@bind f Select([cos => "cosine function", sin => "sine function"])

f(0.5)
MultiSelect
This widget allows the user to select multiple element by holding Ctrl / Cmd while clicking a more items.
@bind vegetable_basket MultiSelect(["potato", "carrot", "boerenkool"])vegetable_basketJust like Select, you can also give an array of pairs.
Show docstring for MultiSelect
MultiSelect
MultiSelect(options::Vector; [default], [size::Int])
# or with a custom display value:
MultiSelect(options::Vector{Pair{Any,String}}; [default], [size::Int])
A multi-selector - the user can choose one or more of the options.
See Select for a version that allows only one selected item.
Examples
@bind vegetables MultiSelect(["potato", "carrot"])

if "carrot" ∈ vegetables
	"yum yum!"
end
@bind chosen_functions MultiSelect([sin, cos, tan, sqrt])
[f(0.5) for f in chosen_functions]You can also specify a display value by giving pairs bound_value => display_value:
@bind chosen_functions MultiSelect([
	cos => "cosine function",
	sin => "sine function",
])

[f(0.5) for f in chosen_functions]
The size keyword argument may be used to specify how many rows should be visible at once.
@bind letters MultiSelect(string.('a':'z'), size=20)MultiCheckBox
This widget allows the user to select multiple elements using checkboxes.
@bind fruit_basket MultiCheckBox(["apple", "blueberry", "mango"])fruit_basketYou can use MultiSelect and MultiCheckBox with any vector of objects, not just strings:
@bind my_functions MultiCheckBox(["sin", "cos", "tan"])[(n == "sin" ? sin(π) : n == "cos" ? cos(π) : tan(π)) for n in my_functions]Just like Select, you can also give an array of pairs. See the Live Docs for MultiCheckBox for all the customization options!
Show docstring for MultiCheckBox
MultiCheckBox
MultiCheckBox(options::Vector; [default::Vector], [orientation ∈ [:row, :column]], [select_all::Bool])A group of checkboxes - the user can choose which of the options to return. The value returned via @bind is a list containing the currently checked items.
See also: MultiSelect.
options can also be an array of pairs key::Any => value::String. The key is returned via @bind; the value is shown.
Keyword arguments
defaultsspecifies which options should be checked initally.orientationspecifies whether the options should be arranged in:row's:column's.select_allspecifies whether or not to include a "Select All" checkbox.
Examples
@bind snacks MultiCheckBox(["🥕", "🐟", "🍌"]))

if "🥕" ∈ snacks
    "Yum yum!"
end
@bind functions MultiCheckBox([sin, cos, tan])
[f(0.5) for f in functions]@bind snacks MultiCheckBox(["🥕" => "🐰", "🐟" => "🐱", "🍌" => "🐵"]; default=["🥕", "🍌"])@bind animals MultiCheckBox(["🐰", "🐱" , "🐵", "🐘", "🦝", "🐿️" , "🐝", "🐪"]; orientation=:column, select_all=true)CounterButton
@bind clicked CounterButton("Hello world")clickedButton as reactive trigger
In the example above, any cell that references clicked will re-evaluate when you click the button. This means that you can a button as a reactive trigger, by referencing its value in another cell.
@bind go CounterButton("Recompute")I am 2 years old!
let
	# deterministic "random-feeling" age derived from the click count, so the
	# wasm island reproduces it exactly (rand() can't — it's non-deterministic)
	md"I am $((go * 7 + 1) % 15 + 1) years old!"
end
Show docstring for CounterButton
CounterButton
A button that sends back the number of times that it was clicked.
You can use it to trigger reactive cells.
Examples
In one cell:
@bind go CounterButton("Go!")and in a second cell:
begin
	# reference the bound variable - clicking the button will run this cell
	go

	md"My favorite number is $(rand())!"
end
Button
There is also the widget LabelButton, which returns the button label as reactive value.
LabelButton is currently bound to the alias Button, but in a future release of PlutoUI, Button will be changed to alias CounterButton, since it is more useful.
Show docstring for LabelButton
LabelButton
A button that sends back the same value every time that it is clicked.
You can use it to trigger reactive cells.
See also CounterButton to get the number of times the button was clicked.
Examples
In one cell:
@bind go Button("Go!")and in a second cell:
begin
	# reference the bound variable - clicking the button will run this cell
	go

	md"My favorite number is $(rand())!"
end
FilePicker
FilePicker()(FilePicker uploads a file — file I/O is handled server-side, so this widget is shown generically rather than compiled into a wasm island.)
The file picker is useful if you want to show off your notebook on a dataset or image uploaded by the reader. It will work anywhere - you don't access files using their path.
The caveat is that large files might take a long time to get processed: everything needs to pass through the browser. If you are using large datasets, a better option is to use Select to let the reader pick a filename. You can then read the file using Base.read(filename, type)
Show docstring for FilePicker
FilePicker
A file upload box. The chosen file will be read by the browser, and the bytes are sent back to Julia.
The optional accept argument can be an array of MIMEs. The user can only select files with these MIME. If only image/* MIMEs are allowed, then smartphone browsers will open the camera instead of a file browser.
Examples
@bind file_data FilePicker()
file_data["data"]
You can limit the allowed MIME types:
@bind image_data FilePicker([MIME("image/jpg"), MIME("image/png")])
# and use MIME groups:
@bind image_data FilePicker([MIME("image/*")])
DownloadButton
The download button is not an input element that you can @bind to, it's an output that you can use to get processed data from your notebook easily. The second argument is the output filename.
DownloadButton("Example processed output from your notebook.", "output.txt")DownloadButton([0x01, 0x02, 0x03], "secret_data.bin")
Show docstring for DownloadButton
DownloadButton
Button to download a Julia object as a file from the browser.
See FilePicker to do the opposite.
Examples
DownloadButton("Roses are red,", "novel.txt")DownloadButton(UInt8[0xff, 0xd8, 0xff, 0xe1, 0x00, 0x69], "raw.dat")import JSON
DownloadButton(JSON.json(Dict("name" => "merlijn", "can_cook" => true)), "staff.json")If you want to make a local file available for download, you need to read the file's data:
let
    filename = "/Users/fonsi/Documents/mydata.csv"
    DownloadButton(read(filename), basename(filename))
end
Clock
@bind t Clock()tYou can set the interval (5.0 seconds), and disable the UI (true):
@bind t_slow Clock(5.0, true)t_slowYou can use a Clock to drive an animation! Or use it to repeat the same command at an interval: just like with Button, you can reference a bound (reactive) variable without actually using it!
Show docstring for Clock
Clock
No documentation found for public binding PlutoUI.ClockNotebook.Clock.
Summary
struct PlutoUI.ClockNotebook.ClockFields
interval      :: Real
fixed         :: Bool
start_running :: Bool
max_value     :: Union{Nothing, Int64}
repeat        :: Bool
Show variable name with @bindname
You can use the macro @bindname instead of @bind to display the variable name before the bond:
With @bind:
@bind test1 Slider(1:20)With @bindname, you see the name (test2):
@bindname test2 Slider(1:20)High-level inputs
@bind distance confirm(Slider(1:100))distanceconfirm can be wrapper around any input element to create a new one, including inputs from other packages, or inputs that you have made yourself!
Show docstring for confirm
confirm
confirm(element::Any; label::Union{String, Nothing}=nothing)Normally, when you move a Slider or type in a TextField, all intermediate values are sent back to @bind.
By wrapping an input element in confirm, you get a button to manually control when the value is sent, intermediate updates are hidden from Pluto.
One case where this is useful is a notebook that does a long computation based on a @bind input.
label specifies a custom label for the confirm button.
Examples
@bind x confirm(Slider(1:100))

x == 1 # (initially)
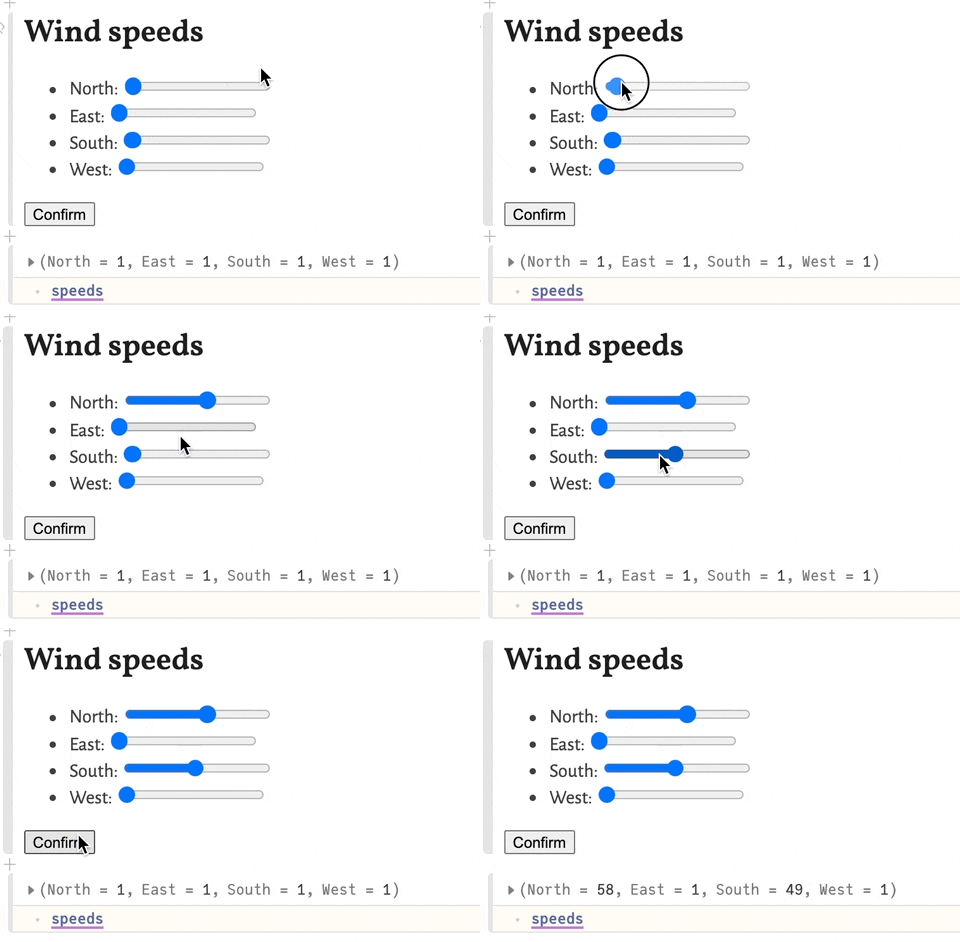
Now, when you move the slider, nothing happens, until you click the "Confirm" button, and x is set to the new slider value.
The result looks like:

See also
You can combine this with PlutoUI.combine!
@bind speeds confirm(
	combine() do Child
		@htl("""
		<h3>Wind speeds</h3>
		<ul>
		$([
			@htl("<li>$(name): $(Child(name, Slider(1:100)))")
			for name in ["North", "East", "South", "West"]
		])
		</ul>
		""")
	end
)
The result looks like:
Combine
This next high-level component is a bit tricky, but very powerful!
Using combine, you can create a single input out of multiple existing ones! In the example below, we create a new input, wind_speed_input. Notice that the list of wind directions is dynamic: if you add a new direction, a 5th slider will appear!
import PlutoUI: combineWind speeds
North:
East:
South:
West:
@bind speeds wind_speed_input(["North", "East", "South", "West"])speedsspeeds.Northfunction wind_speed_input(directions::Vector)
return combine() do Child
inputs = [
md""" $(name): $(
Child(name, Slider(1:100))
)"""
for name in directions
]
md"""
#### Wind speeds
$(inputs)
"""
end
endUse the Live Docs to learn more about combine and to see additional examples.
🙋
combineis very useful in combination with HypertextLiteral.jl, which you can learn using our JavaScript sample notebook.
Show docstring for combine
combine
PlutoUI.combine(render_function::Function)Combine multiple input elements into one. The combined values are sent to @bind as a single tuple.
render_function is a function that you write yourself, take a look at the examples below.
Examples
🐶 & 🐱
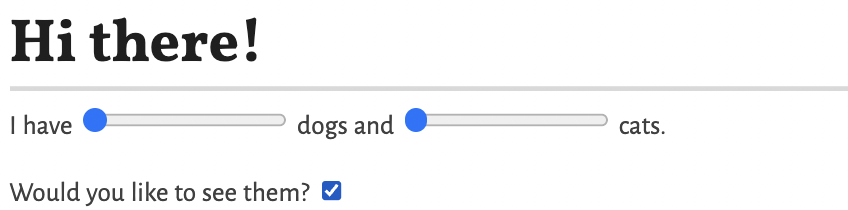
We use the do syntax to write our render_function. The Child function is wrapped around each input, to let combine know which values to combine.
@bind values PlutoUI.combine() do Child
	md"""
	# Hi there!

	I have $(
		Child(Slider(1:10))
	) dogs and $(
		Child(Slider(5:100))
	) cats.

	Would you like to see them? $(Child(CheckBox(true)))
	"""
end

values == (1, 5, true) # (initially)
The output looks like:
And the bound value
(1, 5, true).
🎏
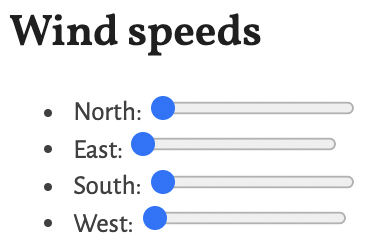
The combine function is most useful when you want to generate your input elements dynamically. This example uses HypertextLiteral.jl for the @htl macro:
function wind_speeds(directions)
	PlutoUI.combine() do Child
		@htl("""
		<h6>Wind speeds</h6>
		<ul>
		$([
			@htl("<li>$(name): $(Child(Slider(1:100)))</li>")
			for name in directions
		])
		</ul>
		""")
	end
end

@bind speeds wind_speeds(["North", "East", "South", "West"])

speeds == (1, 1, 1, 1) # (initially)

# after moving the sliders:
speeds == (100, 36, 73, 60)
The output looks like:
And the bound value
(1, 1, 1, 1).
Named variant
In the last example, we used Child to wrap around contained inputs:
Child(Slider(1:100))We can also use the named variant, which looks like:
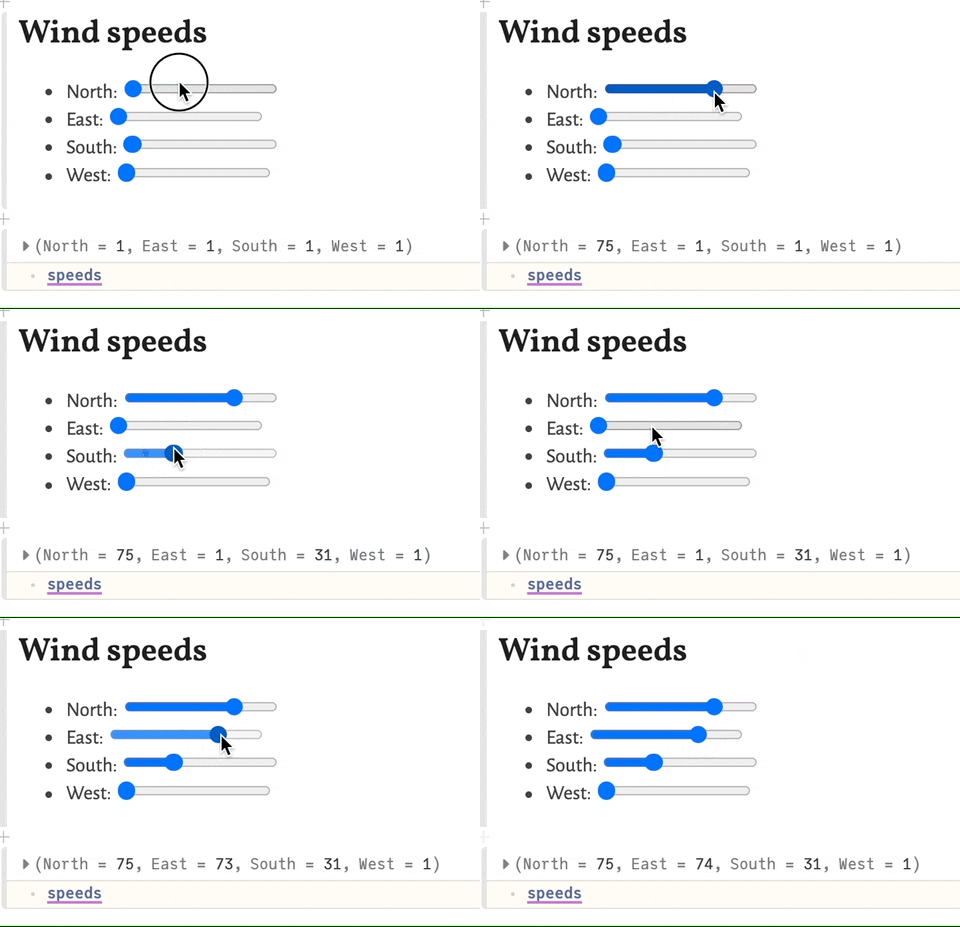
Child("East", Slider(1:100))When you use the named variant for all children, the bound value will be NamedTuple, instead of a Tuple.
Let's rewrite our example to use the named variant:
function wind_speeds(directions)
	PlutoUI.combine() do Child
		@htl("""
		<h6>Wind speeds</h6>
		<ul>
		$([
			@htl("<li>$(name): $(Child(name, Slider(1:100)))</li>")
			for name in directions
		])
		</ul>
		""")
	end
end

@bind speeds wind_speeds(["North", "East", "South", "West"])

speeds == (North=1, East=1, South=1, West=1) # (initially)

# after moving the sliders:
speeds == (North=100, East=36, South=73, West=60)

md"The Eastern wind speed is $(speeds.East)."
The output looks like:
Why?
You can make a new widget!
You can use combine to create a brand new widget yourself, by combining existing ones!
In the example above, we created a new widget called wind_speeds. You could put this function in a package (e.g. WeatherUI.jl) and people could use it like so:
import WeatherUI: wind_speeds

@bind speeds wind_speeds(["North", "East"])
In other words: you can use combine to create application-specific UI elements, and you can put those in your package!
Difference with repeated @bind
The standard way to combine multiple inputs into one output is to use @bind multiple times. Our initial example could more easily be written as:
md"""
# Hi there!

I have $(@bind num_dogs Slider(1:10)) dogs and $(@bind num_cats Slider(5:10)) cats.

Would you like to see them? $(@bind want_to_see CheckBox(true))
"""
The combine function is useful when you are generating inputs dynamically, like in our second example. This is useful when:
The number of parameters is very large, and you don't want to write
@bind parameter1 ...,@bind parameter2 ..., etc.The number of parameters is dynamic! For example, you can load in a table in one cell, and then use
combinein another cell to select which rows you want to use.
Loading resources
Notebooks use data from different places. For example, you use Base.read to access local data (files) inside your Julia code, and Downloads.jl for remote data (interwebs).
PlutoUI helps you communicate with the person reading the notebook!
To get remote media (URL) inside your Markdown text, use
PlutoUI.Resource.To get local media (file) inside your Markdown text, use
PlutoUI.LocalResource.
(With media, we mean images, video and audio.)
We strongly recommend that you use remote media inside Pluto notebooks!
If your notebook uses local images, then those images will not show when someone else opens your notebook, unless they have the same images on their computer, at the exact same location. More on this later.
Resource
If you just want to show images inside Markdown, you can use the built-in syntax (without PlutoUI):
md"Here is a _dog_: "PlutoUI.Resource has some extra features:
specify image dimensions and spacing
support for videos
support for audio
Hello I am a dog 
And I sound like this:
This is my flower friend
Attributes
You can pass additional HTML attributes to Resource, these will be added to the element. For example:
Resource(flower_url, :width => 200, :autoplay => "", :loop => "")YouTube, Vimeo, etc.
If you use Resource for video, the URL has to point to a video file (like .mp4 or .mov).
Popular video sites don't give you that link, instead, you can use their embed codes. You can find these inside the video player, by right clicking or using the menu buttons. You then use that inside an HTML block:
html"""
~ paste embed code here ~
"""
You might need to change the width to 100% to make it fit.
html"""

<div style="padding:56.25% 0 0 0;position:relative;"><iframe src="https://player.vimeo.com/video/438210156" style="position:absolute;top:0;left:0;width:100%;height:100%;" frameborder="0" allow="autoplay; fullscreen" allowfullscreen></iframe></div><script src="https://player.vimeo.com/api/player.js"></script>

"""
Show docstring for Resource
Resource
Resource(src::String, mime=mime_from_filename(src)[, html_attributes::Pair...])A container for a URL-addressed resource that displays correctly in rich IDEs.
Examples
Resource("https://julialang.org/assets/infra/logo.svg")Resource("https://interactive-examples.mdn.mozilla.net/media/examples/flower.webm", :width => 100)md"""
This is what a duck sounds like: $(Resource("https://interactive-examples.mdn.mozilla.net/media/examples/t-rex-roar.mp3"))
md"""LocalResource (not always recommended)
The examples above use Resource to make media from a URL available inside Markdown. To use local files, simply replace Resource with LocalResource, and use a file path instead of a URL.
SystemError: opening file "C:\\Users\\fons\\Pictures\\hannes.jpg": No such file or directory
OOPS, it didn't!
Here are two tips for getting local images to work correctly:
Go to imgur.com and drag&drop the image to the page. Right click on the image, and select "Copy image location". You can now use the image like so:
PlutoUI.Resource("https://i.imgur.com/SAzsMMA.jpg")
If your notebook is part of a git repository, place the image in the repository and use a relative path:
PlutoUI.LocalResource("../images/cat.jpg")
Why does it have to be so difficult?
Pluto only stores code in the notebook file, not images. This minimal file format is very valuable, but it means that images need to be addressed, not stored.
Addressing local files is fragile: if someone else opens the notebook, or if you move the notebook to a different folder, that image file needs to be available at exactly the same path. This is difficult to do correctly, and if it works for you, it is hard to tell if it will work for someone else.
Putting images online might be a hassle, but once it works, it will work everywhere! The stateless nature of URLs means that the images will work regardless of how the notebook file is accessed, while keeping a minimal file format.
Show docstring for LocalResource
LocalResource
Create a Resource for a local file (a base64 encoded data URL is generated).
WARNING
LocalResource will not work when you share the script/notebook with someone else, unless they have those resources at exactly the same location on their file system.
Recommended alternatives (images)
Go to imgur.com and drag&drop the image to the page. Right click on the image, and select "Copy image location". You can now use the image like so:
PlutoUI.Resource("https://i.imgur.com/SAzsMMA.jpg").If your notebook is part of a git repository, place the image in the repository and use a relative path:
PlutoUI.LocalResource("../images/cat.jpg").
Examples
LocalResource("./cat.jpg")LocalResource("/home/fons/Videos/nijmegen.mp4", :width => 200)md"""
This is what a duck sounds like: $(LocalResource("../data/hannes.mp3"))
md"""Display and layout
We are working on more options for controlling layout in notebooks: putting things in boxes, grids, side-by-side, etc.
Reading time
PlutoUI contains a handy widget to display the estimated reading time of the current document.
ReadingTimeEstimator()
Show docstring for ReadingTimeEstimator
ReadingTimeEstimator
Add a reading time estimate to your Pluto notebook based on markdown content.
Arguments
wpm::Int=200: Words per minute reading speed (typical range: 150-300)position::Symbol=:top: Where to display (:topor:floating)style::Symbol=:minimal: Display style (:minimalor:detailed)
Examples
reading_time()  # Simple "📖 5 min read"

reading_time(wpm=250, style=:detailed)  # "📖 Reading time: 4 minutes (850 words at 250 wpm)"

reading_time(position=:floating)  # Floating in corner
details
Using details, you can create a block with an always-visible title and foldable further content. Users need to click to read the content.
This is useful for showing overly verbose details that would disrupt the normal flow of the text, or to hide, e.g., solutions of exercises in a tutorial notebook.
In the example below, the code behind the cell is shown (to demonstrate how to use details). Normally, you would use details in a cell with hidden code.
Read a long text
Here is some very long text
Did you know that Pluto was written in Julia and JavaScript? Pluto is open source, which means that you can read its source code and learn exactly how it works!
Open source also means that you are invited to contribute to Pluto – you can report issues, suggest features, or even submit your own code changes to help improve it. Whether you’re fixing a small typo or designing a big new feature, every contribution is welcome. By participating, you not only help others, but also learn more about Julia, web technologies, and interactive computing. 🌱
details(
	"Read a long text",
	md"""
	#### Here is some very long text
	Did you know that Pluto was written in Julia and JavaScript? Pluto is open source, which means that you can read its source code and learn exactly how it works!

	Open source also means that you are invited to contribute to Pluto – you can [report issues](https://github.com/fonsp/Pluto.jl/issues), suggest features, or even [submit your own code changes](https://github.com/fonsp/Pluto.jl/pulls) to help improve it. Whether you’re fixing a small typo or designing a big new feature, every contribution is welcome. By participating, you not only help others, but also learn more about Julia, web technologies, and interactive computing. 🌱
	"""
)
Using the open keyword argument, you can say whether the box should initialize in an open state.
Show docstring for details
details
details(summary, contents; open::Bool=false)Create a collapsable details disclosure element (<details>).
Useful for initially hiding content that may be important yet overly verbose or exposing advanced variables that may not always need displayed.
Arguments
summary::Any: the always visible summary of the details element.contents::Any: the item(s) to nest within the details element.
Keyword arguments
open::Bool=false: whether the details element is initially open.
Examples
details("My summary", "Some contents")details(
"My summary",
[
"My first item",
(@bind my_var Slider(1:10)),
md"How are you feeling? $(@bind feeling Slider(1:10))",
],
open=true,
)Beware @bind in collection declaration
You may want to @bind several variables within the contents argument by declaring a collection of @bind expressions. Wrap each @bind expression in parenthesis or interpolate them in md strings like the example above to prevent macro expansion from modifying how your collection declaration is interpreted.
# This example will cause an error
details(
	"My summary",
	[
		"My first item",
		@bind my_var Slider(1:10),
	]
)
WideCell
You can use WideCell from PlutoUI to show something in an extra wide cell. If the screen is big enough, this cell will be extra wide, breaking out of the usual 700px wide margins of the Pluto notebook.
On a narrow screen (like a phone or a small window), the cell will fit to the screen width, like any other cell. This avoids overflow, where content is not visible.
WideCell(
md"""
#### Hello from an extra wide cell! I can fit so so so so so so so so so so so so so so so so much in here!
Here is a picture:

"""
)The nicest way to use this is with the |> arrow operator in Julia. You can add it at the end of a cell:
let
	x = 1:25
	y = 4:13

	M = [
		a*b
		for b in y, a in x
	]

	all_text = repr(MIME"text/plain"(), M)
	Text(all_text)

end |> WideCell
You can also specify the width. Take a look at the complete docstring:
Show docstring for WideCell
WideCell
WideCell(something_to_display::Any; max_width::Int64=1000)Display something in an extra wide cell, breaking out of the usual margins of the Pluto notebook (usually constrained to be 700px wide). The second argument controls the new maximum width, in pixels.
The cell remains responsive: if the window is not wide enough to display the cell, the cell will resize to fit. In particular, on a screen less than 700px wide, this function has no effect.
Example
This function has to be returned directly from a cell to work. For example:
let
content = md"""
# Hello from an extra wide cell!
Here is a picture:

"""
WideCell(content)
endCombination with Layout
This function works well in combination with PlutoUI.ExperimentalLayout to create a dashboard-like experience.
Single-argument version
WideCell(; max_width::Int64=1000)::FunctionA single-argument method that returns an anonymous function that makes an object wider. This is useful together with the |> operator in Julia:
plot(x, y) |> WideCell(; max_width=1200)ExperimentalLayout
You can use PlutoUI.ExperimentalLayout to display multiple objects together in one cell. Play around and explore!
We are still figure out what API to expose, and where to publish it, hence the "Experimental".
Show docstring for ExperimentalLayout
ExperimentalLayout
No docstring found for internal module PlutoUI.ExperimentalLayout.
Public names
DOMElement, Div, em, fr, grid, hbox, pc, pt, px, vbox, vh, vmax, vmin, vw
Package description from README.md:

PlutoUI.jl


A small package with interactive elements to be used in Pluto.jl.
@bind x PlutoUI.Slider(1:100)repeat("Hello ", x)For documentation, read the PlutoUI.jl featured notebook.
ExperimentalLayout.aside
The aside function lets you place content on the right margin of the page. You might need to hide the Table of Contents to see it (top left corner of the ToC). On small screens (when there is no margin), the aside will automatically turn into regular block content.
PlutoUI.ExperimentalLayout.aside(content_for_aside)This feature is most useful when you hide the code. You can use it to give additional information, without breaking the flow of the main content.
In this example, I created the content in another cell, using ; at the end to disable its display.
content_for_aside = md"""
This information is in the sidebar!
!!! tip
You can put anything in here, like a picture:

""";NotebookCard
You can use NotebookCard to create an inviting link to another notebook. This is available for notebooks on sites generated using PlutoPages.jl and PlutoSliderServer.jl. The image, title and description are taken from notebook frontmatter. Check out the docstring to learn more!

Loading...
NotebookCard("https://plutojl.org/en/docs/expressionexplorer/")
Show docstring for NotebookCard
NotebookCard
NotebookCard(notebook_url::String; [link_text::String])Create a nice-looking card to showcase another notebook. You can use this to create a link to a notebook that stands out clearly in your document.
This only works for notebooks hosted on websites that are generated with PlutoPages.jl or PlutoSliderServer.jl. Support for pluto.land notebooks can be added upon request.
The notebook_url argument should be the public URL where users can read the notebook. If you are working on a (course) website, go to your website, and just copy the URL of the web page that you want to link to. You can add a #hash subsection at the end of the URL if you wish.
Frontmatter
The image, title and description will be taken from notebook frontmatter (of the notebook you are linking to). You can edit frontmatter of that notebook using Pluto's built-in frontmatter editor.
Example
Here is an example card, linking to a page in the Pluto documentation website (generated with PlutoPages.jl):
NotebookCard("https://plutojl.org/en/docs/expressionexplorer/")This is what it looks like in a notebook:

PlutoUI without Pluto
Huh?
Did you know that you can run Pluto notebooks without Pluto? If your notebook is called wow.jl, then
$ julia wow.jlwill run the notebook just fine.
When you use @bind, your notebook can still run without Pluto! Sort of. Normally, all bound variables are assigned the value missing when you run it elsewhere. However, the PlutoUI types have all been configured to assign a more sensible default value.
For example, if your notebook contains
@bind x Slider(10:20)and you run it without Pluto, then this statement simply assigns x = 10.
Pluto and PlutoUI work independently of each other! In fact, you could write a package with fun input elements, or add @bindable values to existing packages.
Appendix
space = html"<br><br><br>"using HypertextLiteral
Show docstring for Slider
Slider
A slider over the given values.
Examples
@bind x Slider(1:10)
@bind x Slider(0.00 : 0.01 : 0.30)
@bind x Slider(1:10; default=8, show_value=true)
@bind x Slider(range(-π, π, 1000); default=0, show_value=x-> "$(round(x, digits=2)) rad")
@bind x Slider(["hello", "world!"])
HiddenDocs(PlutoUI, :Slider)